Friday, January 31, 2014

Mirror image

I found this in a book of miniatures, and loved the simplicity of it. I'll see if I can find more information on it. In the meantime, use a xerox machine to print a mirror image of something, and then collage both images in a way that makes it look like an actual reflection. Black and white reflections against a colored background could be powerful. Or divide the page in half and have everything in color on one side, and black and white on the other. Rendering the same designs in black and white and color is a great graphic design exercise in itself.


Sunday, November 24, 2013

Punch transfer technique

In an old book about Indian miniatures I came across this ancient method of transferring an image...and I found it fascinating. It's a stencil of sorts, but would be fun to do with kids since it doesn't involve complicated positives and negatives, rather it's a fairly straightforward way of copying images, with no limitations on how complex the original image is.

The act of copying things has become such a non-issue for kids growing up surrounded by xerox machines and in-home color printers and copiers that I think it's fun to point out that it wasn't always this simple. Entire art forms have been invented for the purpose of making copies. I have alway enjoyed teaching children rudimentary ways of copying images, from covering the back of a page with graphite or pencil lead and then tracing over the image to on front (homemade carbon paper), to actual carbon paper--stacks and stacks of it for multiple images, and, of course, printmaking. But this punch transfer is new to me.

Offer kids a darning needle, toothpick, or drypoint tool and challenge them to punch holes along the important lines of a drawing or a photograph. With a new piece of paper underneath, use a bit of ground up charcoal, colored pastel, or tempera powder and rub gently on top of the image, making sure it doesn't move until entire image is covered. Then connect the dots on the paper underneath. It could be fun to make multiple copies, overlap images, even thread a needle and make stitches in the original punched paper. Many of the shapes in the original could probably be punched out and used for collage. This could be a fun one-off project for exploring and experimentation in between projects, or it could turn into something bigger. I always enjoy being honest with the kids when I'm trying something new, and encourage everyone to jump in and brainstorm about possibilities.


Thursday, October 31, 2013

Elephant bells

It's hard to imagine losing an elephant, but a common practice among elephant owners--'mahouts'--is to let their elephants forage freely at night in the jungle. This leaves the problem of how to find the creatures the next day. Elephants wear bells so they can be found. Elephant bells tend to be large, and ornate.

Kids enjoy making 'real', useful objects in art, and an elephant bells project would fit nicely into several different kinds of units. It would be fun to make large bells out of clay, with a hole inside the bell body, as well as in the separately made 'clapper' (the piece inside), that could be attached later using wire or string. Include a hole or handle on top so the bell can hang from something. Use the sgraffito method to scratch patterns and designs on the outside before firing. Alternatively, it could be a fun challenge to make bells out of found objects, silverware, bowls, cans, etc. these objects could be used as forms for paper mâché or embossed tinfoil, painted (add glue to paint to help it stick), or strung together as is.


Wednesday, September 4, 2013

Painted Elephants

Elaborately decorated elephants are used in festivals throughout India. There's some deserved controversy over the treatment of these celebrated animals--but many believe that it is precisely this elevated status that keeps farmers and other folk from killing elephants that destroy their crops. The way these creatures are used as canvases for decoration really is stunning though--and can be used to inspire some incredible art--thanks to the remarkable combination of observation and fantasy.
In my kindergarten class we looked at a photograph of an elephant and made a list of words and phrases that described how we knew it was an elephant. In the picture we studied we noticed that the trunk stretched all the way to the ground. Children made pratice outlines with their fingers to plan their drawings and all the animal parts, then were given black crayons and invited to fill their canvases with elephants. When/if their crayons touched the edge of the paper they were allowed to say 'bump' out loud. It was a great incentive, and the room soon filled with the sound of 'bumps' and the sight of enormous elephants. Black and white paint was offered and children mixed the colors right on the board. Then detail brushes, white paint and other bright colors were introduced, and eventually other embellishments (sequins, tassels, buttons, etc) were offered, and applied with matte medium.
This would work well with older children as well. Invite debate about the controversy (including a reference to the street artist Banksy's use of a live, painted elephant in a recent exhibit in Los Angeles), and inspire them to choose an animal to decorate accompanied by a statement explaining their decision.

Wednesday, June 26, 2013

Leather puppets from Andhra Pradesh

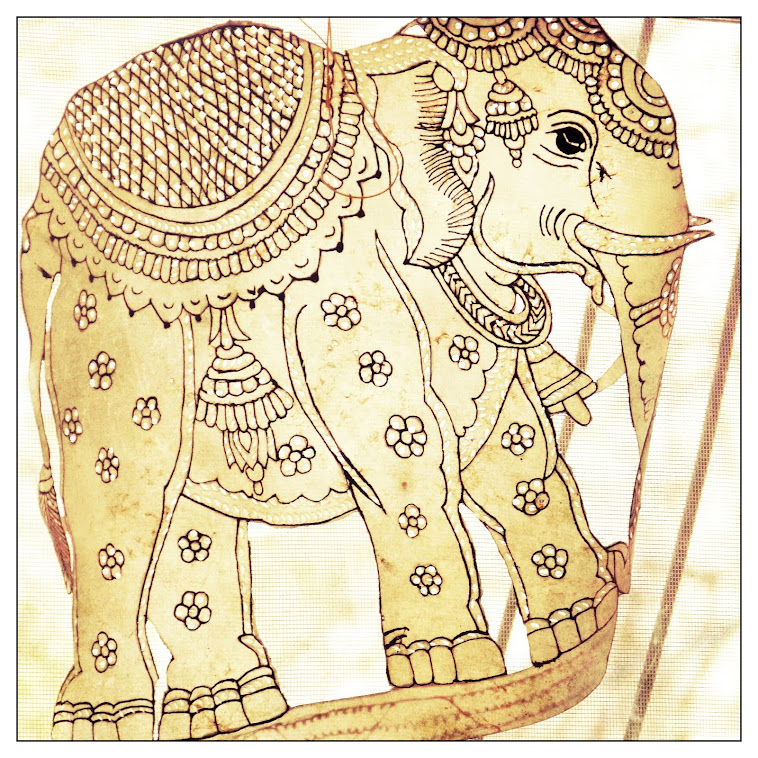
These often jointed puppets are made using colored inks on perforated goat skin leather. They are beautifully detailed and colored, and when light shines through the holes (there are many--if you look closely at these pictures, every dot and circle is a hole), they look like jewels. They are used as shadow puppets, and because of the translucent nature of the goat skin leather the colors end up showing. The elephant on the top of this blog page is also one of these 'puppets'--though it doesn't have jointed parts.

In the spirit of using the goat hide, it would be good to use an upcycled or recycled material to make our own puppets. Ironing together plastic bags (instructions below*) creates a great translucent surface that could easily be cut with scissors, punctured using a needle, or a hole punch, and colored sharpies could be used to decorate these. Recycled cardboard boxes (cereal boxes or cracker boxes, etc) could be used, if translucency is not desired. Alternatively white paper could be glued to something like rice bags or lightweight cloth bags ahead of time (using watered down white or pvc glue) to create a durable and flexible material that would retain some translucency. Joints are attached to the main body with knots of thread, but 'brads' or brass fasteners could be used as well.

Encouraging children to think about what moves, what bends, and what doesn't bend can be a great way to begin this project. Have a child put left hand on right wrist and feel the joint as it moves up and down, next put left hand on right elbow and feel that joint as it moves, then shoulder, etc. show children how to draw separate parts so they fit on one sheet of 'paper' so there isn't too much waste. Color, then cut and assemble.

Children could choose different characters from a familiar story or play as a prompt--in which case it should be considered which movements would be crucial to the story (ie if someone's main action is chopping wood he might not need legs that bend). They could also work on their own individual animals, after some lively discussions about animal actions and unique features.

Detail, showing perforation
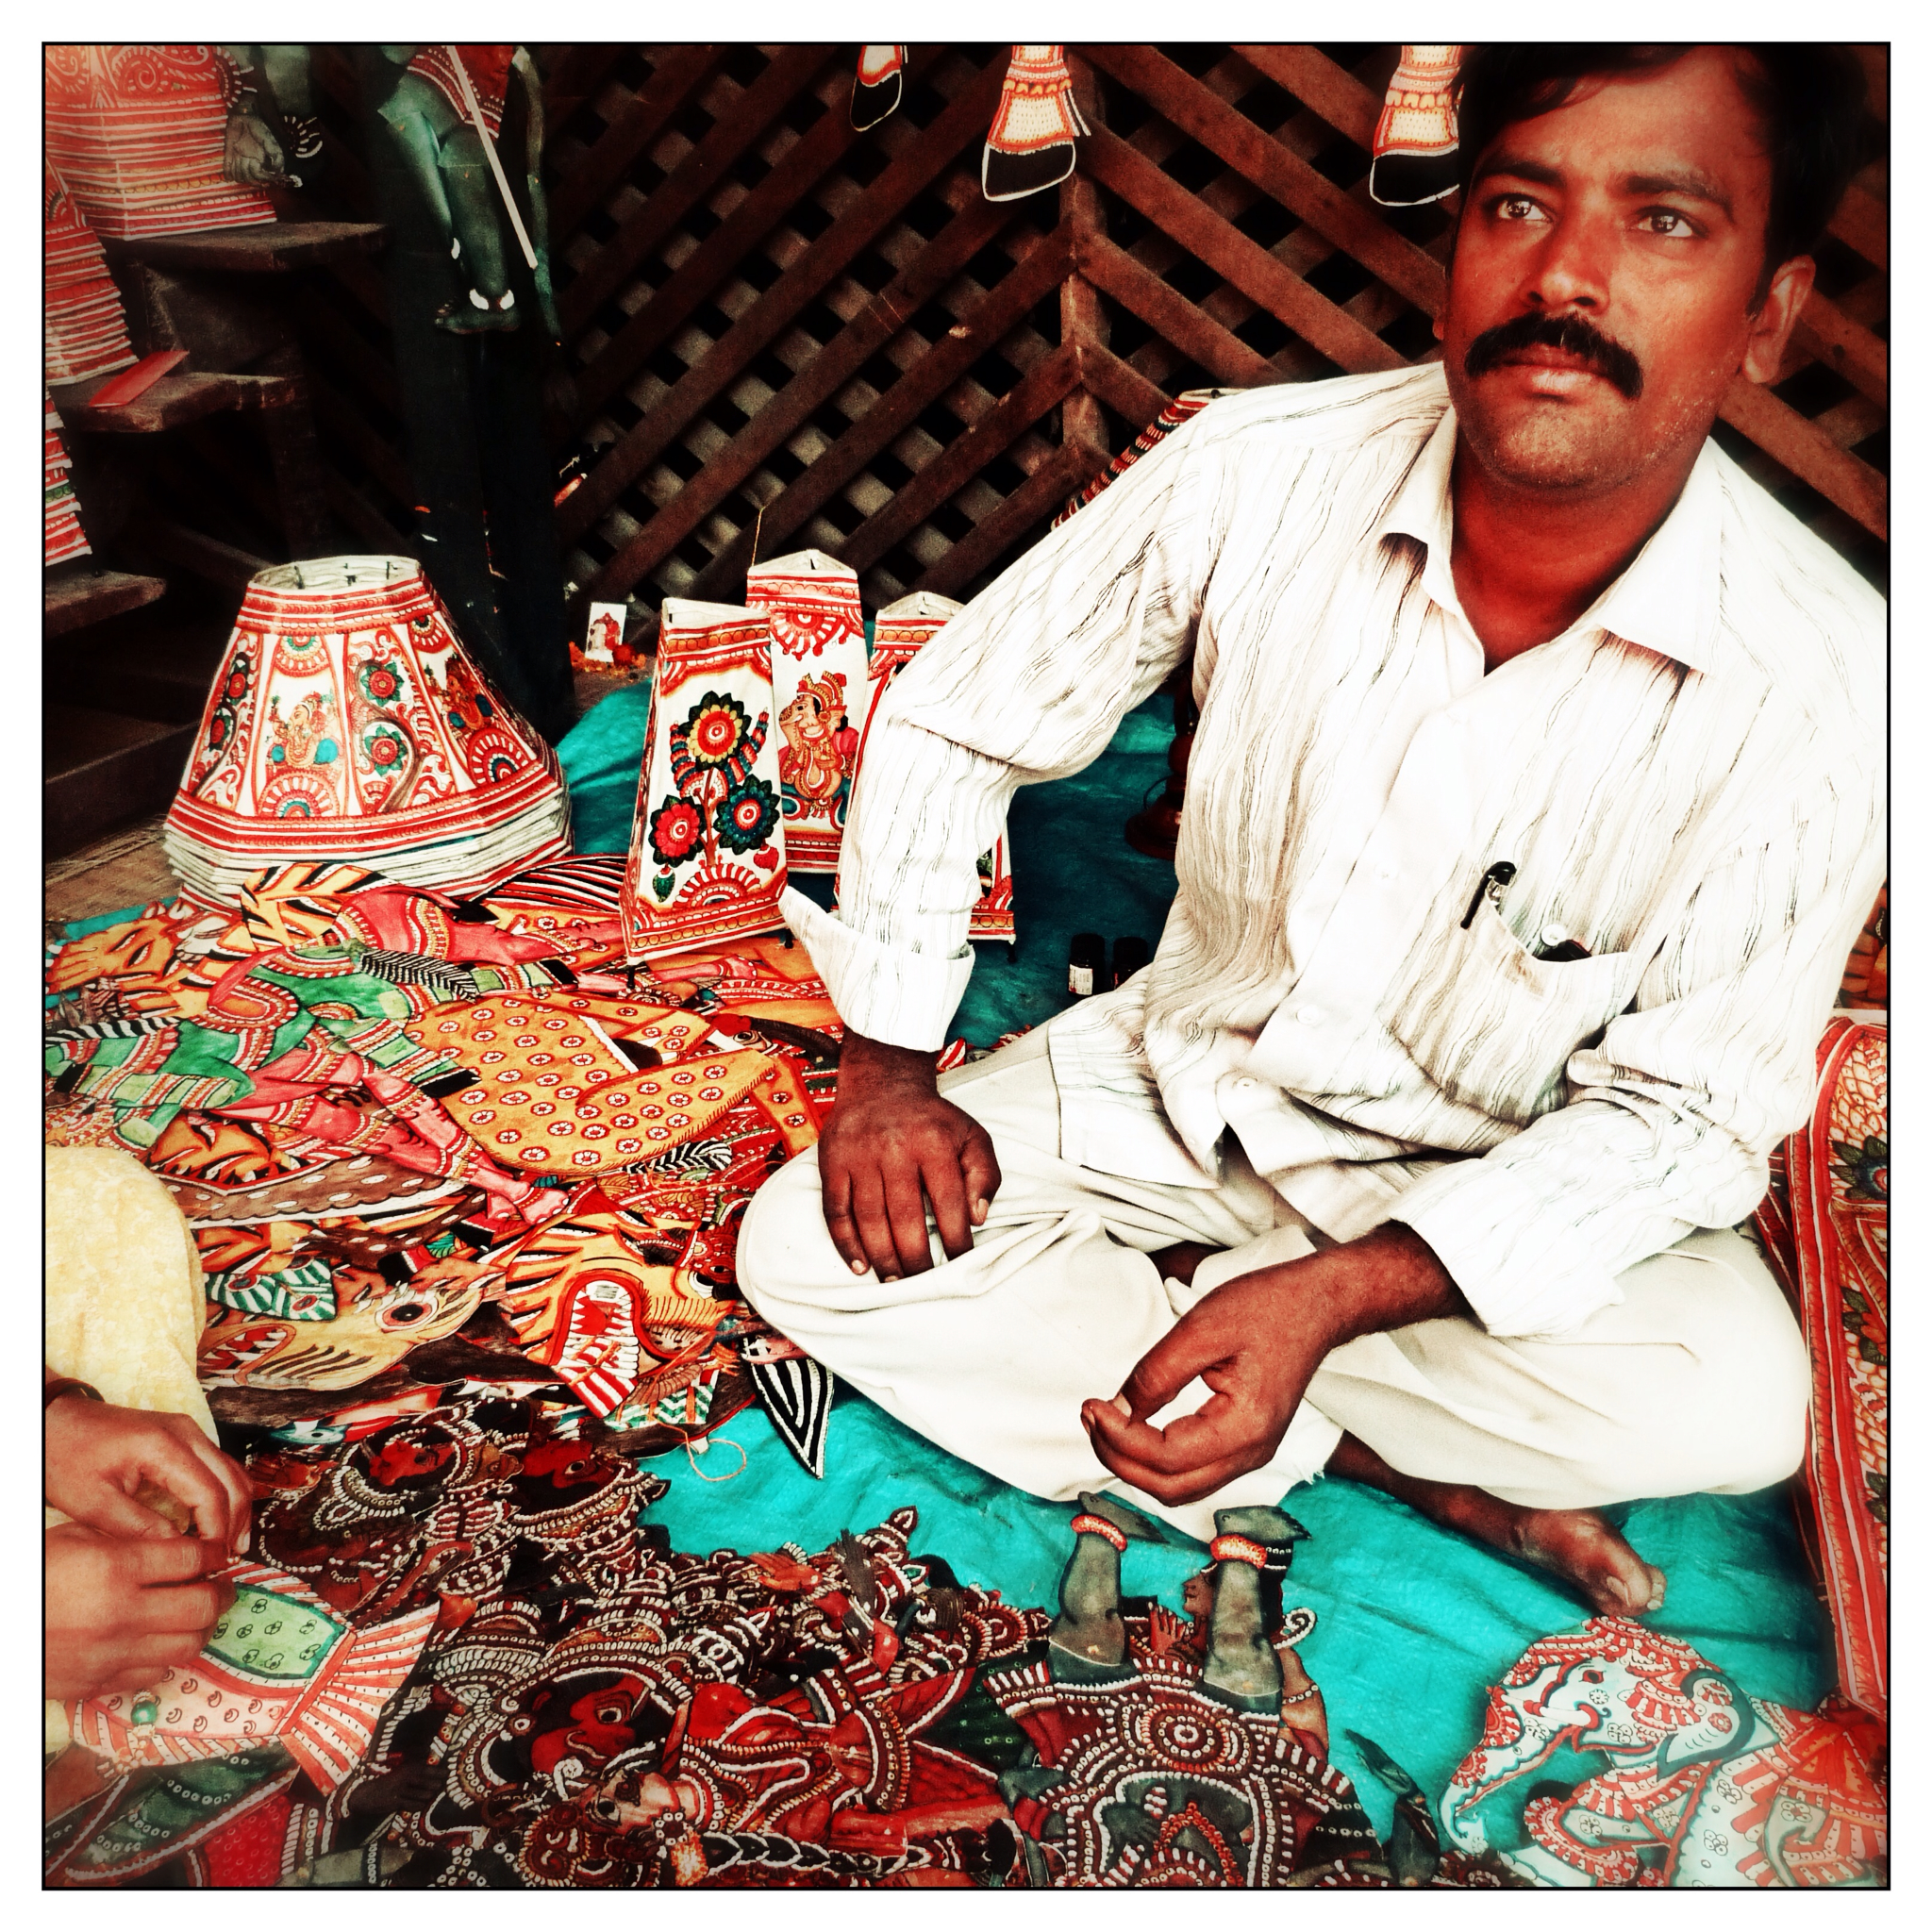
A lamp shade, made using the same materials and techniques
Puppet show, in action
 

*to iron plastic bags, trim off handles and bottom of bags, layer four bags together, smoothed out, between two larger pieces of paper, iron (on medium) continuously, no stopping, until bags are fused together. Do this outside or in a well ventilated area as there will be fumes.


Tile Mural by Khemraj, Rajasthan

Potter Khemraj combines contemporary imagery with traditional technique in a 'stacked' bas relief mural showing a village being consumed by the modern aspects of a larger town. This could be a fun subject for a mural for children, showing some new aspect of technology impacting life as we know it...each child works on a different tile but makes sure that horizontal lines match up for consistency. Children work on square slabs, using coils and clay 'buttons' and other basic hand building techniques to create their scenes. To achieve this raw, weathered, feeling, bisque-fired tiles can be dipped in black glaze, then scrubbed so glaze only lingers in the grooves and edges, before the final firing.


Sunday, June 23, 2013

Terra cotta horse mural project


These large horses were created by villagers in Tamil Nadu so that the protector Aiyanar (the guardian of the fields) could ride them at night to chase away evil demons, thereby ensuring good luck for the town and harvest. Different horses from different areas were decorated with different types of objects and creatures. Smaller sections were created on the wheel, fired separately, and then attached to make these life sized creatures.

In an earlier post I mentioned ideas for individual projects responding to these giant horses, but I just learned about this website, that turns images into large scale half-tone pictures that can be printed out on multiple sheets of regular paper to create an enormous mural. It could be fun to run this image, or a picture of a regular horse, through this process, and invite kids to decorate the different horse sections using either red or brown paint on day one and detail brushes and black paint on another day, or any other material, like black marker for the decorations and pastels for everything else. This is also in keeping with the manner in which the actual sculptures were pieced together by members of the community, so there's a nice symmetry to doing it this way.